Showing posts with label My Creative Time Stamps. Show all posts

Monday, February 18, 2013

Tinkerbell Birthday Card

 
I created this A2 size card for my Besties sweet baby girl, Zoe.
She just turned 3 and loves all things Tinkerbell right now.
 
To create this card I used two Cricut Cartridges.
The green base is from Elegant Edges:
Feature Button: Oblong <Shift>, Button 4 and cut at 5.25
Tink is from Disney Classics:
Using all Feature Layer Buttons: She is Button 27 and cut at 4.0
 
I used my  Cricut Imagine RGB feature for the colors of Tinks Skin, Hair, and Wings.
Skin is R: 253 G: 228 B: 200
Hair is R: 255  G: 245  B: 136
Wings are R: 221  G: 243  B: 239
To find these I googled Tinkerbell RGB Codes and came across this great list by
Courtney Lane Designs...click Here for the direct link.
 
The pink cut that Tink is sitting on is from My Creative Times Vintage Stitched Label Die.
The sentiment is also from My Creative Times Many Greetings stamp set.
I will be entering this card into the MCT Designer Challenge...the challenge was to Emboss.
I used my Cuttlebug Swiss Dots Embossing Folder on Tinks wings and I embossed the sentiment too.
 
I finished off my card by adding Black Divine Twine
and the stitched doodles with my White Gel Pen.
 
Here's a side view...I added dimension by pop dotting Tink and the Vintage Label Die.
I really love how it turned out and can't wait to play some more with my Disney Classic Cartridge.
 
Thanks for stopping by,
Jen


Pin It

Tuesday, January 29, 2013

Sweet Valentine

 
Oh how I've missed crafting and blogging. 
 
I have had a bit of a crafters block, but am hoping to get back into the swing of things 
by joining some challenges. :)
 
My first challenge of the year I am joining is hosted by My Creative Time's Designer Challenge.
I just love all of Emma's Stamps and Dies.
This challenge is a 1 2 3 challenge.
We are to use 1 Bow, 2 Patterned Papers, and 3 Buttons.
 
To create my card I used My Creative Times XL Label Die and the Teeny Tag Greetings Stamp Set.
The beautiful paper is from an American Crafts 6x6 paper pad I got from Michaels.
The ribbon and buttons were from my stash...I haven't looked at my buttons in so long and was so excited to find these super cute heart buttons. :)
 
To finish my card I added Stickles to the turquoise hearts and some doodled stitching.
 
I will also be Linking this card to the following challenges:
 
Shopping Our Stash...Challenge: Theme: Valentines, Hearts, Red, Love
Twisted Tuesday's...Challenge: Anything Goes
Cuttin and Stampin...Challenge: Create a Valentine using a stamp
 
Thanks for stopping by,
Jen


Pin It

Tuesday, October 23, 2012

My Creative Time - Designer Challenge

 
Here is my creation for the My Creative Time Designer Challenge.
 
The challenge is hosted by Shar and she chose a color challenge with the additional challenge of including three flowers on the project.


I had the perfect 6x6 paper pad for this color challenge: Buttercup by LilyBeeDesign.
All of the patterned paper used was with this paper pad.
 
The flower, leaves, & chevron border was cut using the Close To My Heart Artiste Cricut Cartridge:
Feature Button: Accent 2 <Shift> - Button 24, cut at 3.5
The border is a tag welded together using my Gypsy.
Accent 4 - Button 27, cut at 5.5
The leaves can be found on Accent 3 <Shift> - Button 2, cut at 1.25
 
To finish my card I used a My Creative Time Die (Curly Label Die) and Stamp Set (Many Greetings)
 
Side view to show the dimension

So that's it from me...hope you enjoyed! :)

I am also linking this project to Pink Cricut's Link up Tuesday.

Thanks for stopping by!
Jen
 
 
Pin It

Sunday, October 7, 2012

My Creative Time - Challenge


I am entering this card in My Creative Time's Challenge.  Emma from My Creative Time has a member of her Design Team pick the Challenge...this week the Challenge host is Tracy.  Tracy's challenge is to use googly eyes on our project.
 
I just love using googly eyes especially with the Mini Monster's Cricut Cartridge.
It was tough to choose just one monster, but I wanted to use My Creative Time's Small Talk stamp set, so I chose this guy as I thought he fit just perfect in the box.
He is Button 3 on the overlay and cut at 2.5.
To complete him I also used Feature Buttons: Layer 1 and Layer 2.
I then added the googly eyes, which makes him look just perfect! :)
 
The spider is from Happy Hauntings Cricut Cartridge.
He can be found on Button 27 <Shift>, cut at 1.71.
The Small Talk stamp set has a 2.75 x 2.75 dotted frame with a spot left open for 18 different coordinating sentiments to choose from. For this card of course I chose the Boo! sentiment...soo cute!
I then inked one side of the dotted frame to continue the line down so the frame
looks like the spider's web.  I really love how it turned out.
 
To finish up my card I added black ribbon and doodled some dots around the orange paper.
 
I hope everyone has a great week...thanks for stopping by,
Jen
 
Pin It

Sunday, September 23, 2012

Twisted Tuesday Challenge - Flying by to Say Hi


This is my first time participating in the Twisted Tuesday Challenge.
I found this blog challenge through a group I am in on Facebook:
This is a great resource for finding fun challenges all in one spot.
 
 
The challenge was to include something that flies in your project with a twist of using at least 3 different embellishments.
 
I created an A2 size card 5.5 x 4.25
The embossed layer was cut at 5.25 x 4.
 
The Hot Air Balloon and clouds were cut from my Cricut.
Cricut Cuts:
Close to my Heart Artiste Cartridge
Hot Air Balloon: Feature Button Accent 1 & Accent 1 <Shift> - Button 40, cut at 3.75
Clouds: Feature Button Accent 2 - Button 40, cut at 1.0
 
My embellishments were:
Twine - The Twinery Honeydew
Dry Embossing - Cuttlebug Swiss Dots
Stickles - Star Dust
Brads - Joann Brand
Stamp Sentiment - My Creative Time's Teeny Tag Greetings (which comes with the teeny tag die)
 
The paper is from a 6x6 paper pad - Three Bugs in a Rug...Ellie
I love creating cards with these paper pads since the papers/colors all corrdinate so well.
 
Thanks for stopping by,
Jen
 
 
Pin It

Saturday, September 22, 2012

Cropped - Mystery Challenge 4


Here is my entry for the fourth Cropped Challenge. 
The challenge at least 7 circles and some teal.
 
The teal paper is from Megan's paper line Paper Layerz.
The stamps are from My Creative Time:
All around everything
All around everything accessories
Small Talk
 
The rocket is a Cricut cut from Close to my Heart's Artiste cartridge.
The cut can be found on button Feature Button Accent 1, Button 38, cut at 2.32 x 3.25
 
I am happy with how it turned out. :)
Pin It

Thursday, September 20, 2012

Cropped - Challenge 1


I am so excited to be participating in the Cropped Mystery Box Challenge Event hosted by Megan Elizabeth at Above Ruby Studios.  There is going to be a ton of inspiration and I can't wait to see what everyone creates with these challenges.
 
The first challenge was to use a similar style/technique that Megan used in her My 123 Stamp DVD.
I learned a lot of fun stamping tips from this DVD and used several techniques that I learned on my card.  Using these new techniques and stamps I didn't use my Cricut...Gasp!  No worries I'm sure I'll be getting some use from my Cricut during the challenges I will be participating in throughout this weekend.
 
I am getting so excited to craft my weekend away!

Supplies: 
XL Die from My Creative Time
Snowman Stamp/Sentiment from Close to My Heart
Martha Stewart and Tim Holtz Ink
Ribbon: Recycled off of a Christmas Pajama set :)

Pin It

Friday, July 6, 2012

My Cricut Craft Room's 100 Cartridge Blog Hop - July

Welcome to Erica's Craft Room
100 Cricut Cartridge Blog Hop Day ONE
You should have started at http://mycricutcraftroom.blogspot.com/ if not please start at the beginning

Welcome to My Cricut Craft Room's one year "BLOG-iversary" of our first 100 cartridge Blog hop!
A year ago the blog was kicked off with the first design team members and daily postings. It took 2 months to get ready for this hop last year. Now we bring it to you the first full weekend of every month.
Collectively the design team uses over 100 different Cricut Cartridges in their projects during the two days of this hop. Sunday the new members of the design team will be announced and some have even made a project to share with you!! What an exciting weekend!!
As special treat enjoy 10% off of your total purchase with Erica's Craft Room Store.
Use the code JULY to see 10% off of your total purchase (No exclusions)
on July 7 & 8. Also on Sunday there will be an exciting announcement!!!
 
 
Now on to my projects...For this month I am using the following Cricut Cartridges:
Create A Critter, Gypsy Wanderings, Birthday Cakes, Something to Celebrate, and Greeting Cards Inside & Out Imagine Cartridge.
 
A friend at work is planning her daughter, Ryan's, first birthday.  She wanted an Owl theme so of course I automatically thought of the super cute owl on the Create A Critter Cartridge. 
I think I went a bit overboard, but I was so excited  to make all the following projects.
 
My first project are Cupcake Toppers...these may look familiar if you follow my blog as I posted these on Monday as a Sneak Peak of the coordinating Party Decor. For details on how these were created please go to my original post Here.
 
 
Here is a banner that I created for my second project. I used all of the cartridges listed above to create this project.  All of the paper on this banner was created using the Cricut Imagine and the Greetings Cards Inside and Out Cartridge. 
I love the colors and patterns on this cartridge!
 

 My third project are these fun goody bags for the kiddos that will be at the party. The goody bags include Stickers, a Glow Stick Bracelet, Play Dough, and a Squirt Gun since the party is going to be outside at a park. These are the first goody bags I have created and I had a fun with these.  The Thank you sentiment is from My Pink Stamper Fabulous Phrases stamp set.


My last project I am going to share with you will be the Centerpieces for the tables.  My friend has quite a big family and is expecting around 70 people at this party, so I will be working on creating 10 of these centerpieces this weekend. 

Fun Tip: Instead of buying filling for the bucket I am shredding paper myself so the colors will be a perfect match.

The Look Who's 1 sentiment is from Pink By Design Take the Cake stamp set.
 
I welded Look Whoos One to a Circle and this will be a frame for pictures of the Birtday Girl.

The Happy Birtday Sentiment is from My Creative Time Many Greetings Stamp Set.
Cricut Cuts:
  • The Base for the banner is from the Tag Shadow Feature <Shift>, Button 14 on the Gypsy Wanderings cartridge.  These were flood filled with patterns from the Imagine Greetings Inside and Out cartridge.
  • The Font is from the Font Feature and Font Shadow Fearture on Birthday Cakes. (this was used on the cupcake toppers, banner, and centerpieces.)
  • The Owls are from Create A Critter, Button 2 on the overlay using Layer 2, & 3...I skipped layer 1 since I used googly eyes. (this cut was used on all projects)
  • The Rossettes are from the Decor Feature, Button 35 on Something to Celebrate     (this cut was used on the banner and centerpieces)
 
Wow I've been busy and having so much fun creating these projects. :)
Thanks for sticking with me through this long post. 
I hope you have enjoyed my projects.
 
Your next stop is Bunny Freak
Here is the full line up in case you get lost along the way:
Jenny R http://myimagitivity.blogspot.com <<---You Are Here--->>
Pin It

Tuesday, May 8, 2012

Would you Guess Wednesday - Card Feature


Today at My Cricut Craft Room is Would You Guess Wednesday. 
What does that mean you ask?
Well Erica from My Cricut Craft Room challenges the design team to use only the Feature Keys on the Cricut Cartridges.  We can also use a Cricut Cake Cartridge for a paper project. 
For my card today I did both. 

Our main task today was to use a Card Feature.
The card feature that I chose can be found on A Child's Year Cricut Cartridge.
Button 26, cut at 5.5.  I used the same cut for the matt,  I then flipped the cut and hid the score lines with my Gypsy.  One of my many favorite features on the Gypsy.

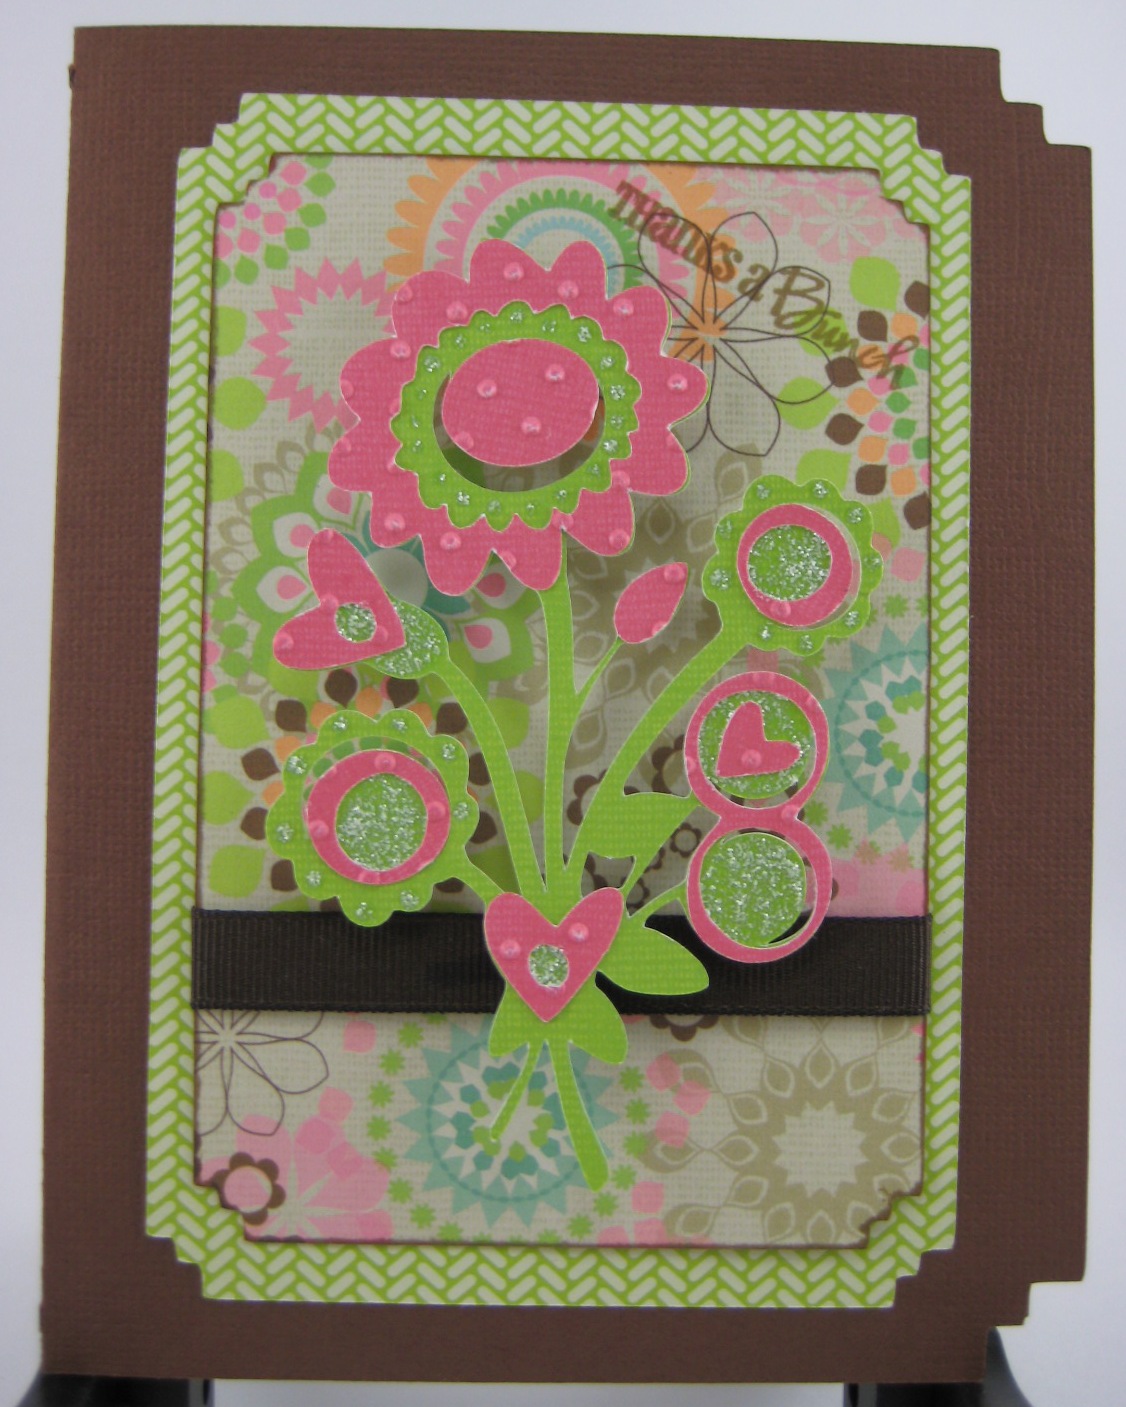
The bunch of flowers are from the Martha Stewart Holiday Cakes Cricut Cartridge.
Button 3, cut at 3.5 with the Shift layer.
To finish off my card I added some ribbon and stamped my Thanks a Bunch sentiment, which is from My Creative Time's Many Greetings.

Please go to My Cricut Craft Room to check out the other wonderful projects created today.

Thanks for stopping by,
Jenny R
Pin It

Sunday, April 8, 2012

Erica's Craft Room Challenges: April 3-9 Card Sketch/Color Challenge


Happy Easter to all of my bloggy friends.
I just wanted to add a quick post today.
Here is my interpretation of the below Sketch over at Erica's Craft Room Challenge.
For the month of April the colors we are to use are Blue-berry, Apple and Grape.


Cricut Cuts using my Gypsy:
All of my cuts were from Art Philosophy
First for my card base I selected Button 33 on the overlay and measured at 5.5 x 4.25.
I then copied this image and welded them together.
I copied this image one more time and changed the size to 4.59 x 3.54.
The bottom circle is Button 1, cut at 2.41.
Feature Button: Basic/Icon Layer, Button 1, cut at 2.41.
The top circle is Button 31, cut at 1.75
Feature Button: Basic/Icon Layer, Button 31, cut at 1.75.
Flower on the bottom can be found on Feature: Combo <Shift> Button 41.
I selected this three times and cut at 1, .75, and .50.


Here's a close up of the flower and twine on the bottom of the card.

To finish off my card I added my sentiment which is from My Creative Time's - Many Greetings and some doodling with a White gel pen.

To join the challenge please go Here.

Thanks for stopping by,
Jenny R
Pin It

Sunday, March 18, 2012

My Cricut Craft Room - My Imagine-ation Monday


Happy Monday!
I hope everyone had a great weekend. 
I spent most of mine in my craft room so it was a very fun weekend for me. :)

Today is My Cricut Craft Rooms My Imagine-ation Monday.  I just love my Imagine...today I used Hello Kitty Greetings and Better Together Imagine Cartridge. 
 One of my favorite features on the Imagine is flood filling images from other cartridges with an Imagine pattern.  This is what I've done for today's card.

Cricut Cuts:
I used the Card Feature Button on Hello Kitty Greetings, Button 9, cut at 5.0 Rel.
This image was flood filled with the pattern from Better Together, page 36.
Feture Button Clothes Layer's, Button 9, cut at 5.0 Rel.
Flood filled with the light yellow that comes with the Better Together Color Palette.
Feature Button Sillohette, Button 9, cut at 5.0 Rel.
Flood filled with the darker yellow that comes with the Better Together Color Palette.

To finish up my card I used pop dots to pop the sun's face and added googley eyes.
I also attached Lemon Divine Twine
 and of course some Stickles (don't remember which ones exactly)

Here is the inside of my card. 
The seintiment is from Pink By Design's Take the Cake.
It says "Hope your day is filled with sunshine & smiles."
The stamped border is from My Creative Time.
Now isn't that just perfect? :)


Please go to My Cricut Craft Room to see all of the other great projects today.

Thank you for stopping by today.
Jen

Pin It

Monday, March 12, 2012

Erica's Craft Room's - March's #2 Card Sketch Challange March 6-13


Here is my entry for Erica's Craft Room Sketch/Color Challenge.
This sketch was really fun to create.
I used Art Philosphy to make my card
The card base is an A2 (4.25 x 5.5) size. 
Art Philosophy Cricut Cuts:
Card Base: Card Feature - Button 3 on the overlay cut at 5.5 x 8.5
Card layer: Button 3 on the overlay cut at 4.25 x 4
Combo Feature - Button 33 cut at 3.43
Label/Tag Feature - Button 6 cut at 1.0
Font Feature - <Shift> Button 49 cut at 2.5 and 3.5
Sentiment: My Creative Time - Many Greetings
Paper:  DCWV Lemon Flower Stack
Queen & Co:  Pearls
I hope you can join us in the challenge HERE.
Thanks for stopping by,
Jen
Pin It

Tuesday, February 28, 2012

My Cricut Craft Room - Would you guess Wednesday


or we could use the Icon Feature.


I chose to use the Icon Feature for my A2 size card today.
The Pooh & Friends Cricut Cartridge has a great Icon feature. 
 The Icon feature on this cartridge has a lot of great garden images, but I found this sweet Turtle on button 30 of the overlay.  He is cut at 2.5 using the Icon Feature, <Shift> Icon Feature, and Icon Shadow Feature.  I flood filled all of the images with patterns from Imagine More Cards.  I love how all of the papers coordinate so easy with the Imagine.


I also used the XL Die from My Creative Time and my Sentiment is also from My Creative Time's Many Greetings stamp set.  To finish up my card I added some Sew Easy Baker's Twine and a little bling for the turtles eye.
To see more projects using Icon features go Here.

I hope you enjoyed!
Jen

Pin It

Monday, February 6, 2012

My Cricut Craft Room - My Imagine-ation Monday


Happy Monday crafters,
I hope you had a fabulous weekend and possibly joined us for My Cricut Craft Rooms 100 Cricut Cartridge blog hop...there was a ton of fabulous projects made by my DT sisters!

Today is My Imagine-ation Monday at My Cricut Craft Room...I hope to inspire you to use your Imagine today.  For this card I used Hey Diddle Diddle and for my card I used only one piece of 12x12 white paper and a 4x4 scrap of white paper...isn't that amazing! :)

 Cricut Cuts:
I made a two sided piece of paper by printing one pattern using the Print Only Setting on one side and flipped the sheet and changed the Setting to Print & Cut. 
I then flood filled the 5:7 rectangle on the stock images that come on the Imagine (cut at 8.1). 
I then selected the Butterfly cut from Create A Critter <Shift> button 41, cut at 2.5 and flood filled with various patterns also from Hey Diddle Diddle.
Once my rectangle was cut with the double sided paper I attached that piece back to my mat and cut the card base which can be found on Art Philosophy using Card Feature <Shift> button 35, cut at 5.5.


Here is the side view of my card...to add dimension to my butterfly I adhered the inside edges of the wings and lifted the outer sides up.  To finish off my card I heat embossed my sentiment which is  from My Creative Time's Many Greetings and I also used her Circle Stitch Die around the sentiment.  I also did some doodle stitching around the butterfly to give her that finishing look.

The inside of the card...I used some pearl accents as the butterfly bodies and added some dots to outline the butterfly cut from the front of the card.
I am super happy with this card!

I hope you enjoyed my card today.
Please go to http://mycricutcraftroom.blogspot.com to see what other wonderful projects
were made on this Imagine-ation Monday!

Thanks for stopping by,
Jen

Pin It

Friday, January 6, 2012

My Cricut Craft Room 100 Cricut Cartridge Blog Hop - Day One

My Cricut Craft Room 100 Cartridge Hop

Happy Saturday Crafters,
Thank you for joining us today on the first 100 Cricut Cartridge Blog Hop of 2012.  You should have come from Karey's crafty goodness.  If you came across this post as one of my followers please start at the begining of the blog hop Here.

For my project this month I made a calendar using Chipboard Hanging Calendar that I got from Erica from My Cricut Craft Room.  I used Create A Critter for my images and patterns from the following Cricut Imagine Cartridges:  Best Friends, Better Together, Imagine More, Imagine More Cards, Kate's Kitchen, & Nursery Tails.  For the calendar part I used My Creative Time Stamps (Whimsical Calendar Days & XL Label Borders)  I also used the XL Label Die that coordinates with these stamp sets.  I am going to use this as my Birthday Calendar in my craft room since it is not year specific.  I didn't want every month to show so instead of hanging it as intended I am going to have them sit on the pictured easel three months at a time.
 
Below each picture is the Imagine Cartridge used and the size of the Critter.
Better Together (Pages 38, 39, 44)
Penguin (Page 39 Cut at 3")
True Blue Stickles

Best Friends (Pages 39, 42, 43)
Ladybug (Page 66 Cut at 3")
Xmas Red Stickles

Nursery Tails (Pages 36 38, 40)
Rabbit (Page 26 Cut at 3")
Frosted Lace Stickles

Nursery Tails (Pages 36, 39, 44)
Zebra (Page 47 Cut at 3")

Best Friends (Pages 37, 42,44)
Hippo (Page 44 Cut at 3")
Star Dust Stickles

Imagine More Cards (Pages 34, 37, 40, 41)
Crab & Sandcastle (Page 40 Cut at 2.3" & 3")

Imagine More Cards (Pages 34, 37, 39, 43)
Turtle (Page 64 Cut at 2")
Waterfall Stickles

Best Friends (Pages 40, 41, 43)
Owl (Page 25 Cut at 3")
Star Dust Stickles

Kate's Kitchen (Pages 41, 43, 44)
Apple (Page 24 Cut at 3")

Imagine More (Pages 39 & 42)
Octopus (Page 42 Cut a 3")
Frosted Lace Stickles

Better Togeether (Pages 37, 40, 42)
Turkey (Page 70 Cut at 3")

Imagine More Cards (Page 40)
Reindeer (Page 73 Cut at 3")
Star Dust Stickles

On the back of each month I created a pocket and used the My Creative Time's die so I can write the name of who's birthday's are on that specific month or any other notes I might want to add for that month.  I like to include the year the person was born...I have a lot of kiddos in my life and it's getting harder to remember their ages, so this helps me a lot. :)
I had such a blast with these Critter's and the Imagine patterns.

Your next stop on the hop is Erica's Project http://ericasprojects.blogspot.com


Below is the entire line up if you get lost along the way:
Pin It

Friday, November 4, 2011

My Cricut Craft Room 100 Cricut Cartridge Blog Hop

My Cricut Craft Room 100 Cartridge Hop

Happy Saturday!

Thank you for joining us today for Day One of My Cricut Craft Room's November 100 Cartridge Blog Hop. You should have hopped to me from the super sweet and talented Madison ...if you just came across my blog and would like to start at the beginning of the hop please go to My Cricut Craft Room. I have two projects for you today using the three cartridges I chose to use this month...Kate's Kitchen (Imagine), Hannah Montana, and Sweethearts (I also ended up using a Font cartridge Jasmine). 
Now on to my first project. 

I created this card for my nephew who is turning 9.  I used Patterns/Colors from Kate's Kitchen and believe it or not Hannah Montana. (I have to tell you I was not interested in the Hannah Montana cartridge until I really looked at it. There are a total of five different fonts and two shadow fonts on this one cartridge and some really great images)  I also wanted to show that this cartridge is not just for girls since it is Hannah Montana. :)
Supplies:
Paper: Bazzill Basics (White), Recollections (Silver), The Paper Co (Ice Cream Social)
A2 Embossing Folder: QuicKutz (Rings)
Stamps: My Creative Time's (Many Greetings)
Pen: Zig Memory Makers (Pure Black)

For my second project I did a double page 12x12 scrapbook layout. 
On these Layouts I used Sweethearts and Jasmine Cricut Cartridges.

I have been wanting to get my wedding album completed so I have been signing up for Scrapbook Saturday's on My Cricut Craft Room. This has really helped me stay motivated. :) Since the Blog Hop is on Saturday I wanted to post my LO's today as well. If you would like to see my other wedding album LO's I have completed please go to my Labels and look under Scrapbook Saturday's.

Supplies:
Paper: Paper Boutique, Coredinations Foundations (Hot Pink & Coffee)
Queen & Co: Irridescent Rhinestones
Stickles: Frosted Lace

Thank you for stopping by on this Hop...I hope you have found tons of inspiration today and a few extra Cricut Cartridges to add to that Christmas Wish List. ;) 

The Next Stop is Blog Candy http://ericasblogcandy.blogspot.com
The complete blog hop list is below in case you get lost along the way.

My Cricut CraftRoom http://mycricutcraftroom.blogspot.com
Sharon http://simplysweetbysharon.blogspot.com/
Melissa http://pinkpolkadotscrapping.blogspot.com
Holly http://hollys-hobbie.blogspot.com/
Yvette http://gammascreativecorner.blogspot.com/
Samantha http://samanthascricutcreations.blogspot.com/ 
Heather F http://www.papercrafteranonymous.com/ 
Suzy's Crafts http://suzyssimplecrafts.blogspot.com/
Tracy http://www.scrappininthewoods.blogspot.com 
Heather S http://operationcricutdesign.blogspot.com/
Shelly http://kccroppers.blogspot.com 
Laura http://laurascraftsandmore.blogspot.com/ 
Ricki http://manicexpressionsdesigns.blogspot.com/ 
Madison http://funkycards.blogspot.com/ 
Jenny R http://myimagitivity.blogspot.com -----You are here----- 
Blog candy- http://ericasblogcandy.blogspot.com/ <<----Next Stop---->> 
Hope you have a crafty weekend!
Jen


9


Pin It